
Make sure that:
- Your file is in CSV or XLSX format.
- The first row contains the column headers.
- Each row represents one record.
- Your file does not contain unnecessary totals, empty rows or merged cells.
- Suppliers, assets and other related data already exist in Muto where required.
- Dates, amounts and percentages use a consistent format.
- If you are starting with an empty database, the most logical import order is: Employees, Assets, Contracts, Cards, Charging Stations, and finally Assignments.
- Assignments can only be done if the data already is imported in Muto.
You can use your own supplier file or download one of the available Muto templates as a starting point.
How to use Smart Import (Step-by-step guidance under video)
-
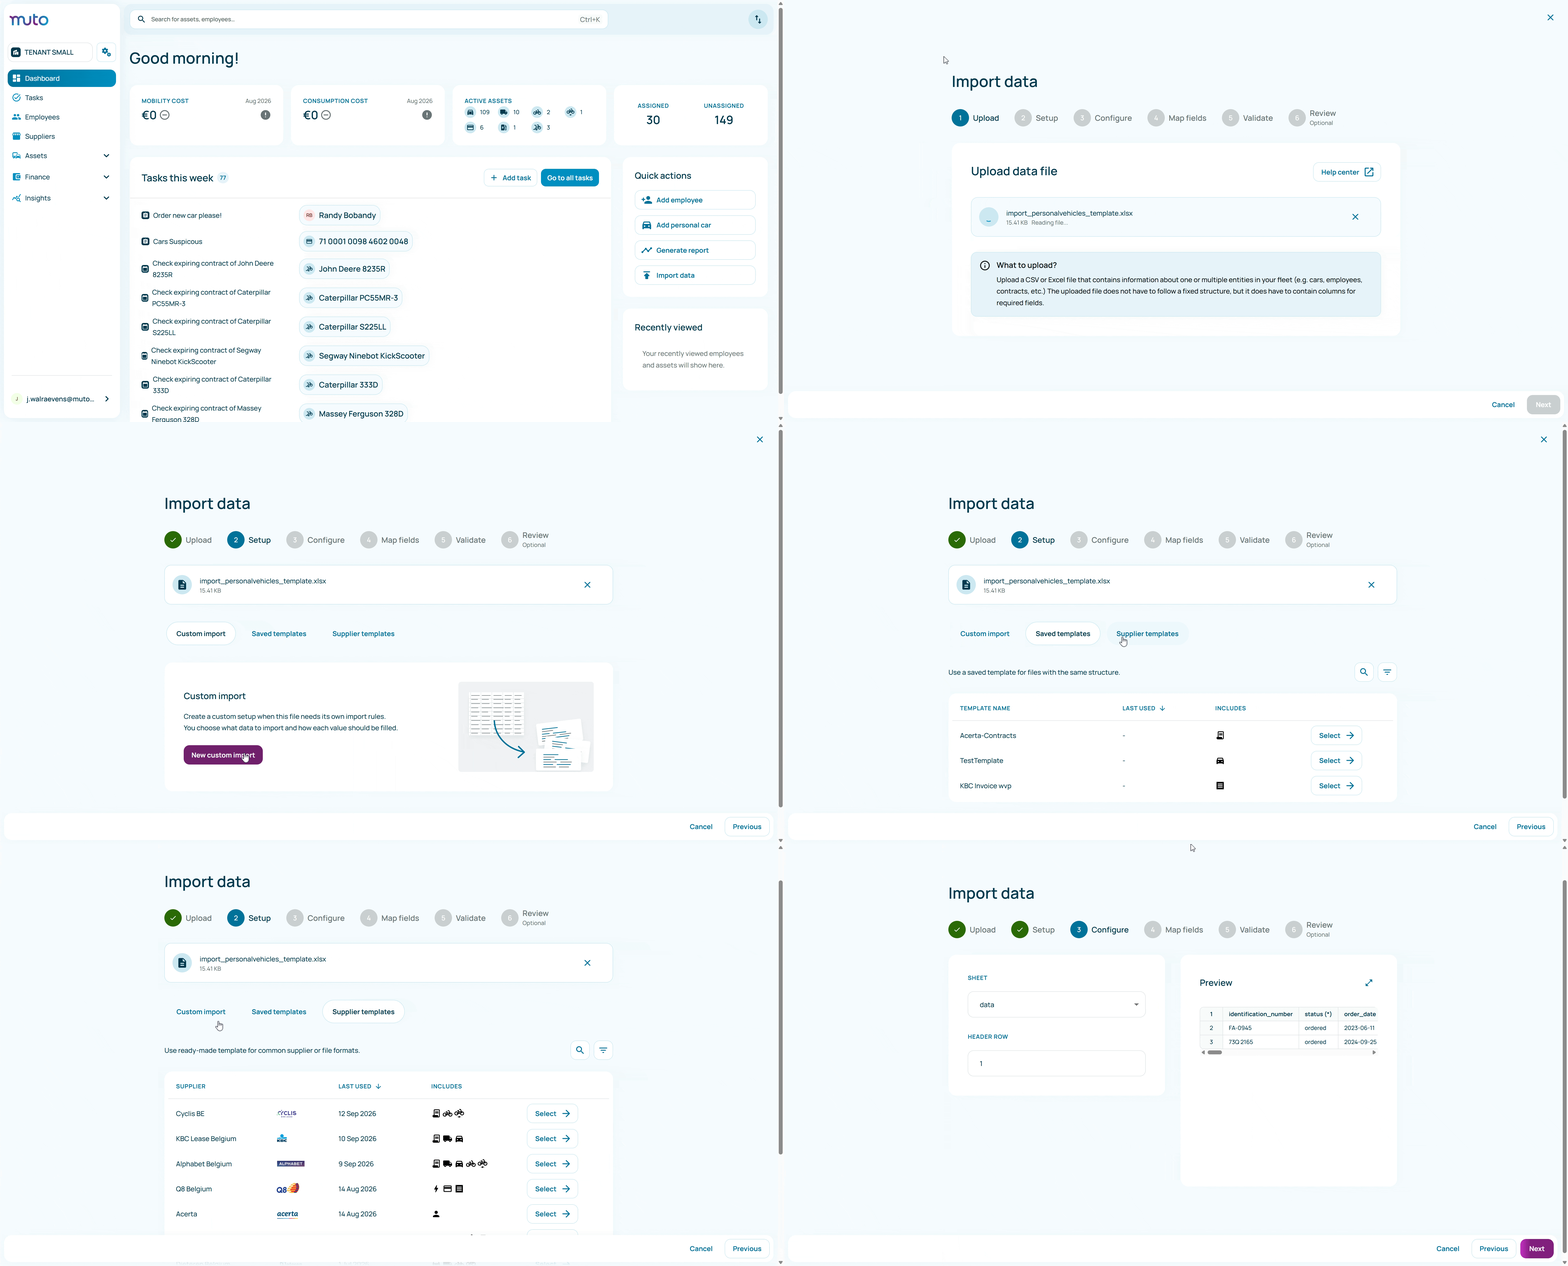
From the dashboard, click Import Data.
-
Upload your CSV or XLSX file by dragging it into the upload area, or click to browse for the file.
-
Choose Customer import, Template or Supplier Template
-
Custom Import 🛠️
Choose this if your file has a unique structure or if you want to define specific rules for this specific upload.
-
When to use it: For one-off files or new data formats.
-
What happens: You will manually choose which data to import and how each value should be mapped to Muto fields in the next steps.
Saved Templates 💾
(You can only select a Template if you saved a Custom Import)This allows you to reuse a configuration you’ve created and saved in the past.
-
When to use it: For recurring imports (e.g., monthly employee updates) where the file format stays the same.
-
What happens: It saves you time by automatically applying your previously defined mapping and validation rules.
Supplier Templates 🏢
Muto Connect comes with pre-configured templates for major industry suppliers (like KBC, Alphabet, etc.).
-
When to use it: When you are importing a standard file directly exported from a supplier portal.
-
What happens: The system already knows the format, so mapping is handled automatically, ensuring high accuracy with minimal effort.
-
-
-
Map each column to the corresponding Muto field.
You can then:
- Select the correct Muto field manually.
- Skip columns that are not relevant.
- Adjust the suggested mappings.
- Merge multiple columns into one field. (Explained below)
- Create calculations using values from one or more columns. (Explained below)
- Use Find and replace to correct repeated values.
Once your mappings are complete, click Confirm.
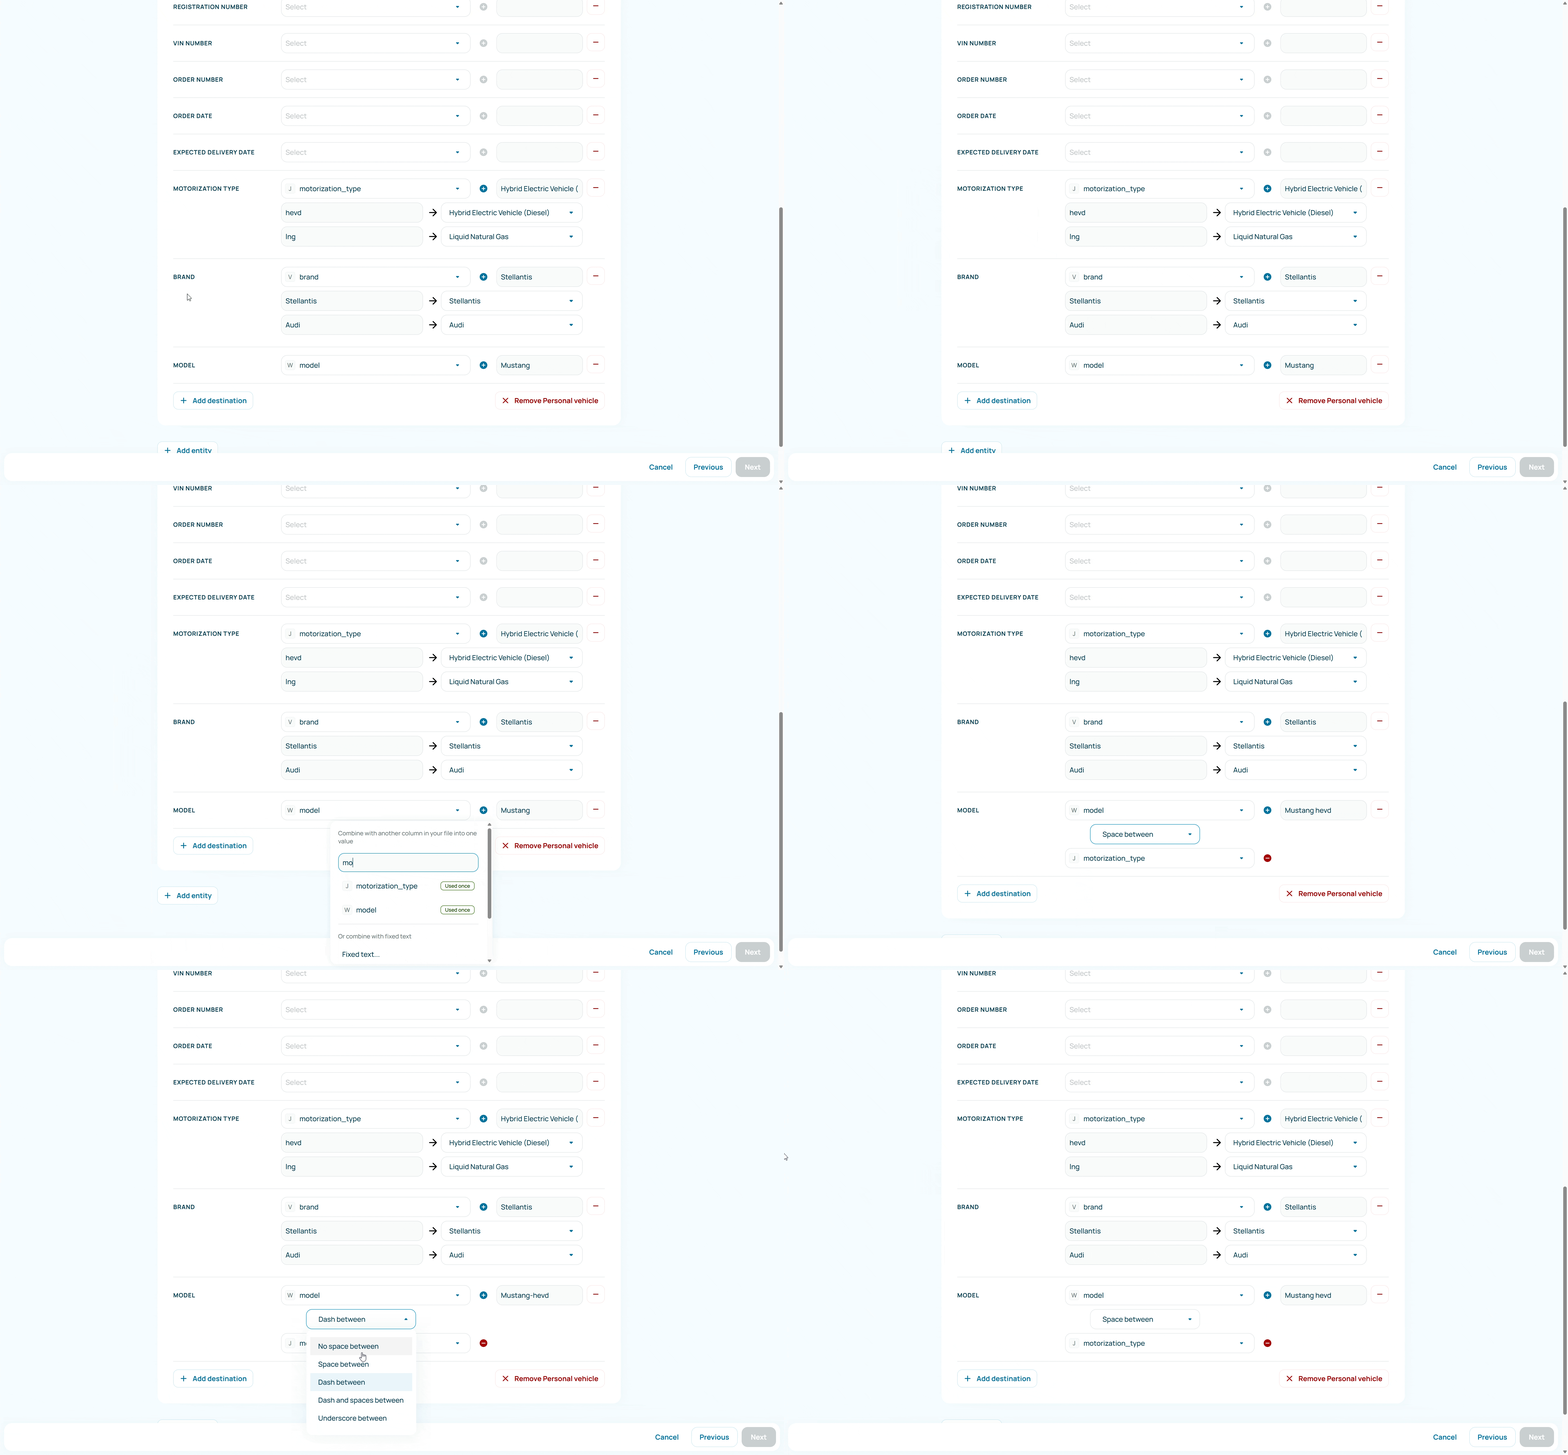
Merge columns
Sometimes the information you need is spread across multiple columns in your file. Smart Import allows you to combine these columns before completing the import.
For example, you can merge:
- Brand and Model into one vehicle description.
- First Name and Last Name into one Driver Name field.
- Street Name and House Number into one address field.
- Multiple parts of an internal reference into one identifier.
Select the columns you want to combine and choose the Muto field where the combined value should be used. Always review the preview to make sure the result is displayed correctly.
Perform calculations
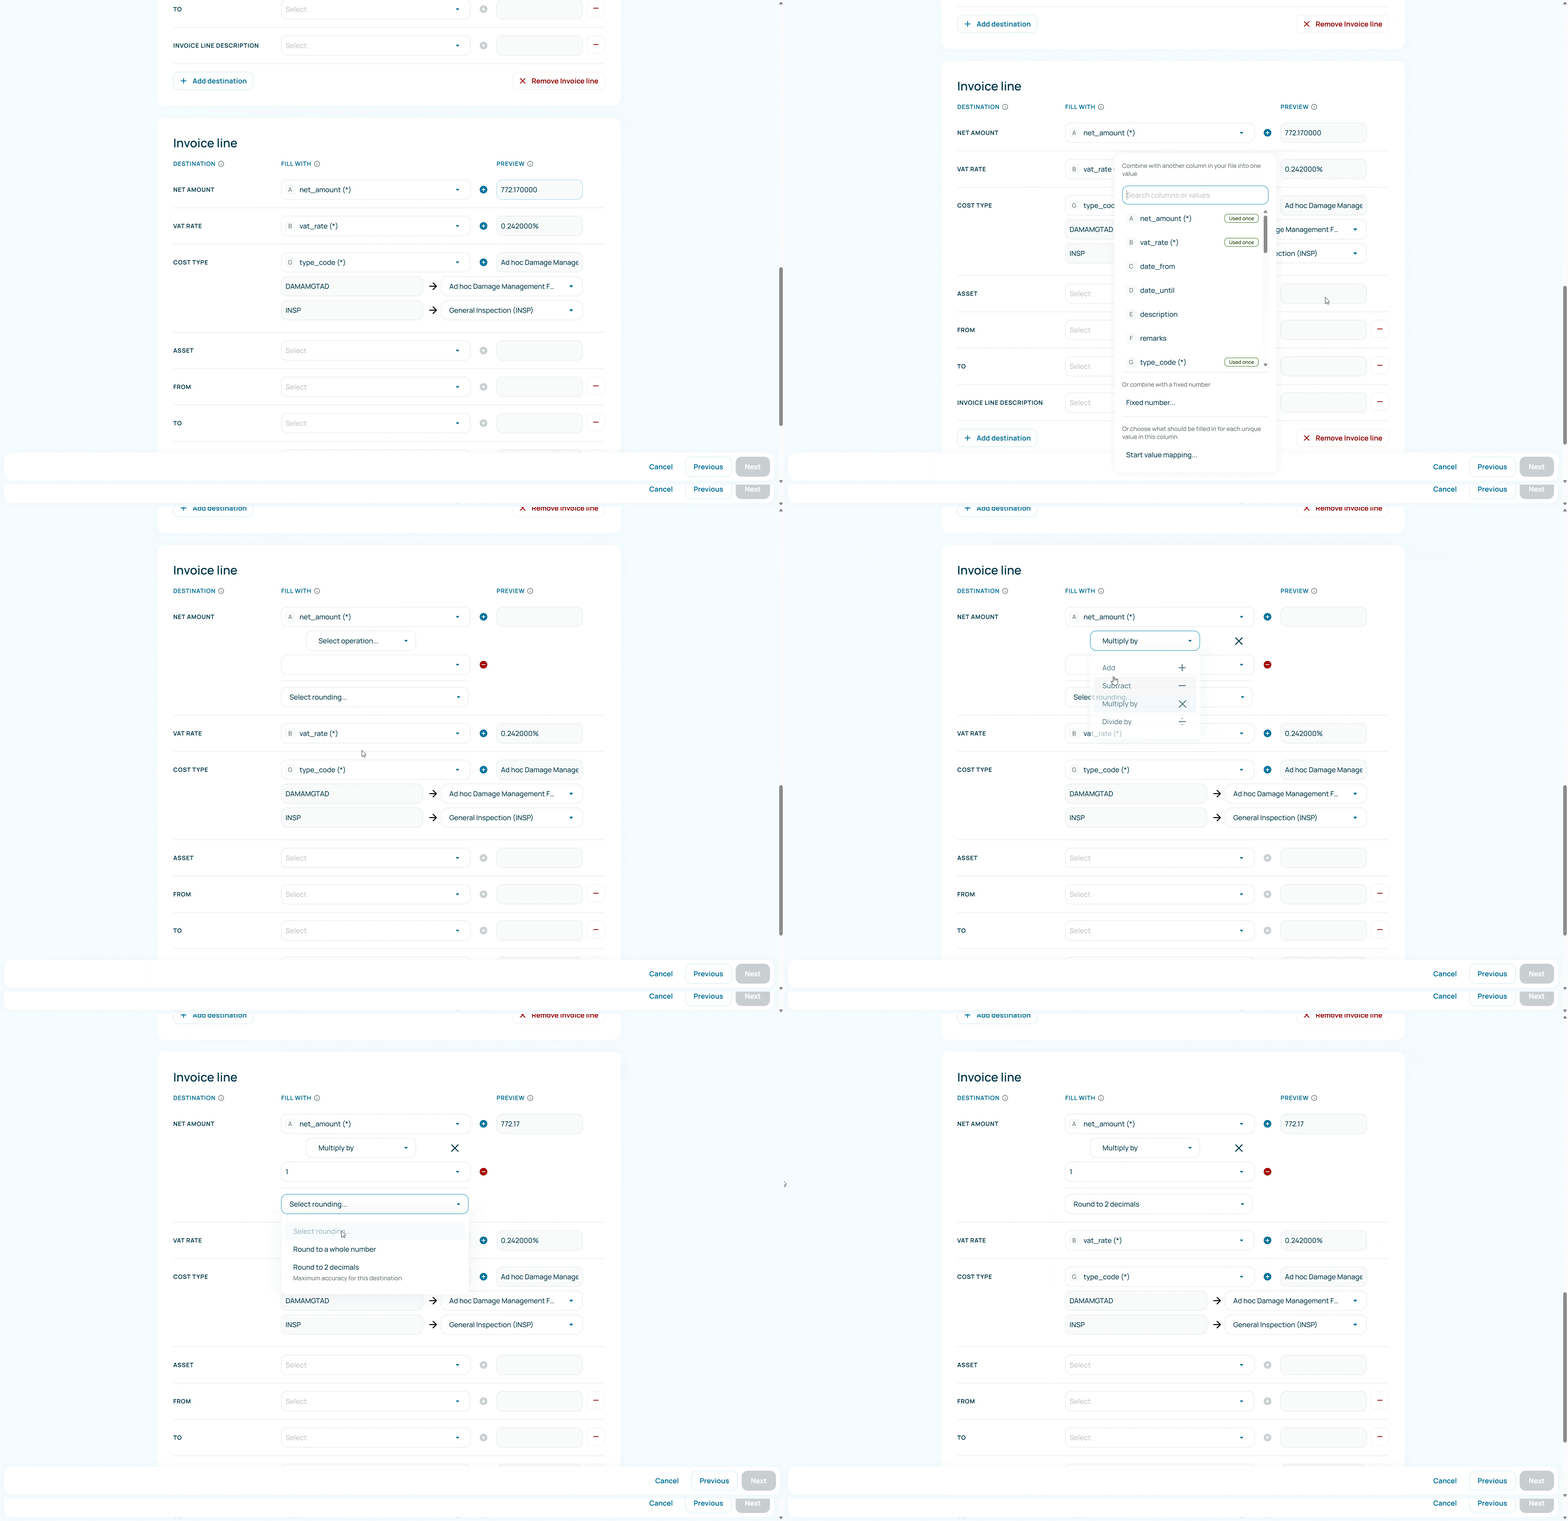
Smart Import can also calculate values during the import process. This is useful when the value required by Muto is not available as a separate column in your supplier file.
For example, you can:
- Calculate a VAT-inclusive amount from a net amount and VAT rate.
- Calculate a monthly cost from an annual total.
- Multiply a unit price by a quantity.
- Add or subtract values from different columns.
- Derive values such as TCO from existing data.
The calculated result is shown in the import preview. Always verify the outcome before completing the import, especially when importing financial information.
How-to guides
Create an order number when your file does not include one
Some imports require an order number, but your supplier file may not contain one. In that case, create an order number by combining the supplier, country, and contract number.
Muto’s preferred format is:
"SUPPLIERCOUNTRYCONTRACTNUMBER"
For example, a contract from Arval in Belgium with contract number 12345 could become ARVALBE12345.
- Open the mapping for the order number.
- Choose Combine text.
- Add the supplier, country, and contract number columns.
- Remove spaces or add separators if needed.
- Check the preview before continuing.
Use a consistent format for all records. This helps Muto identify and link the correct contract or asset later.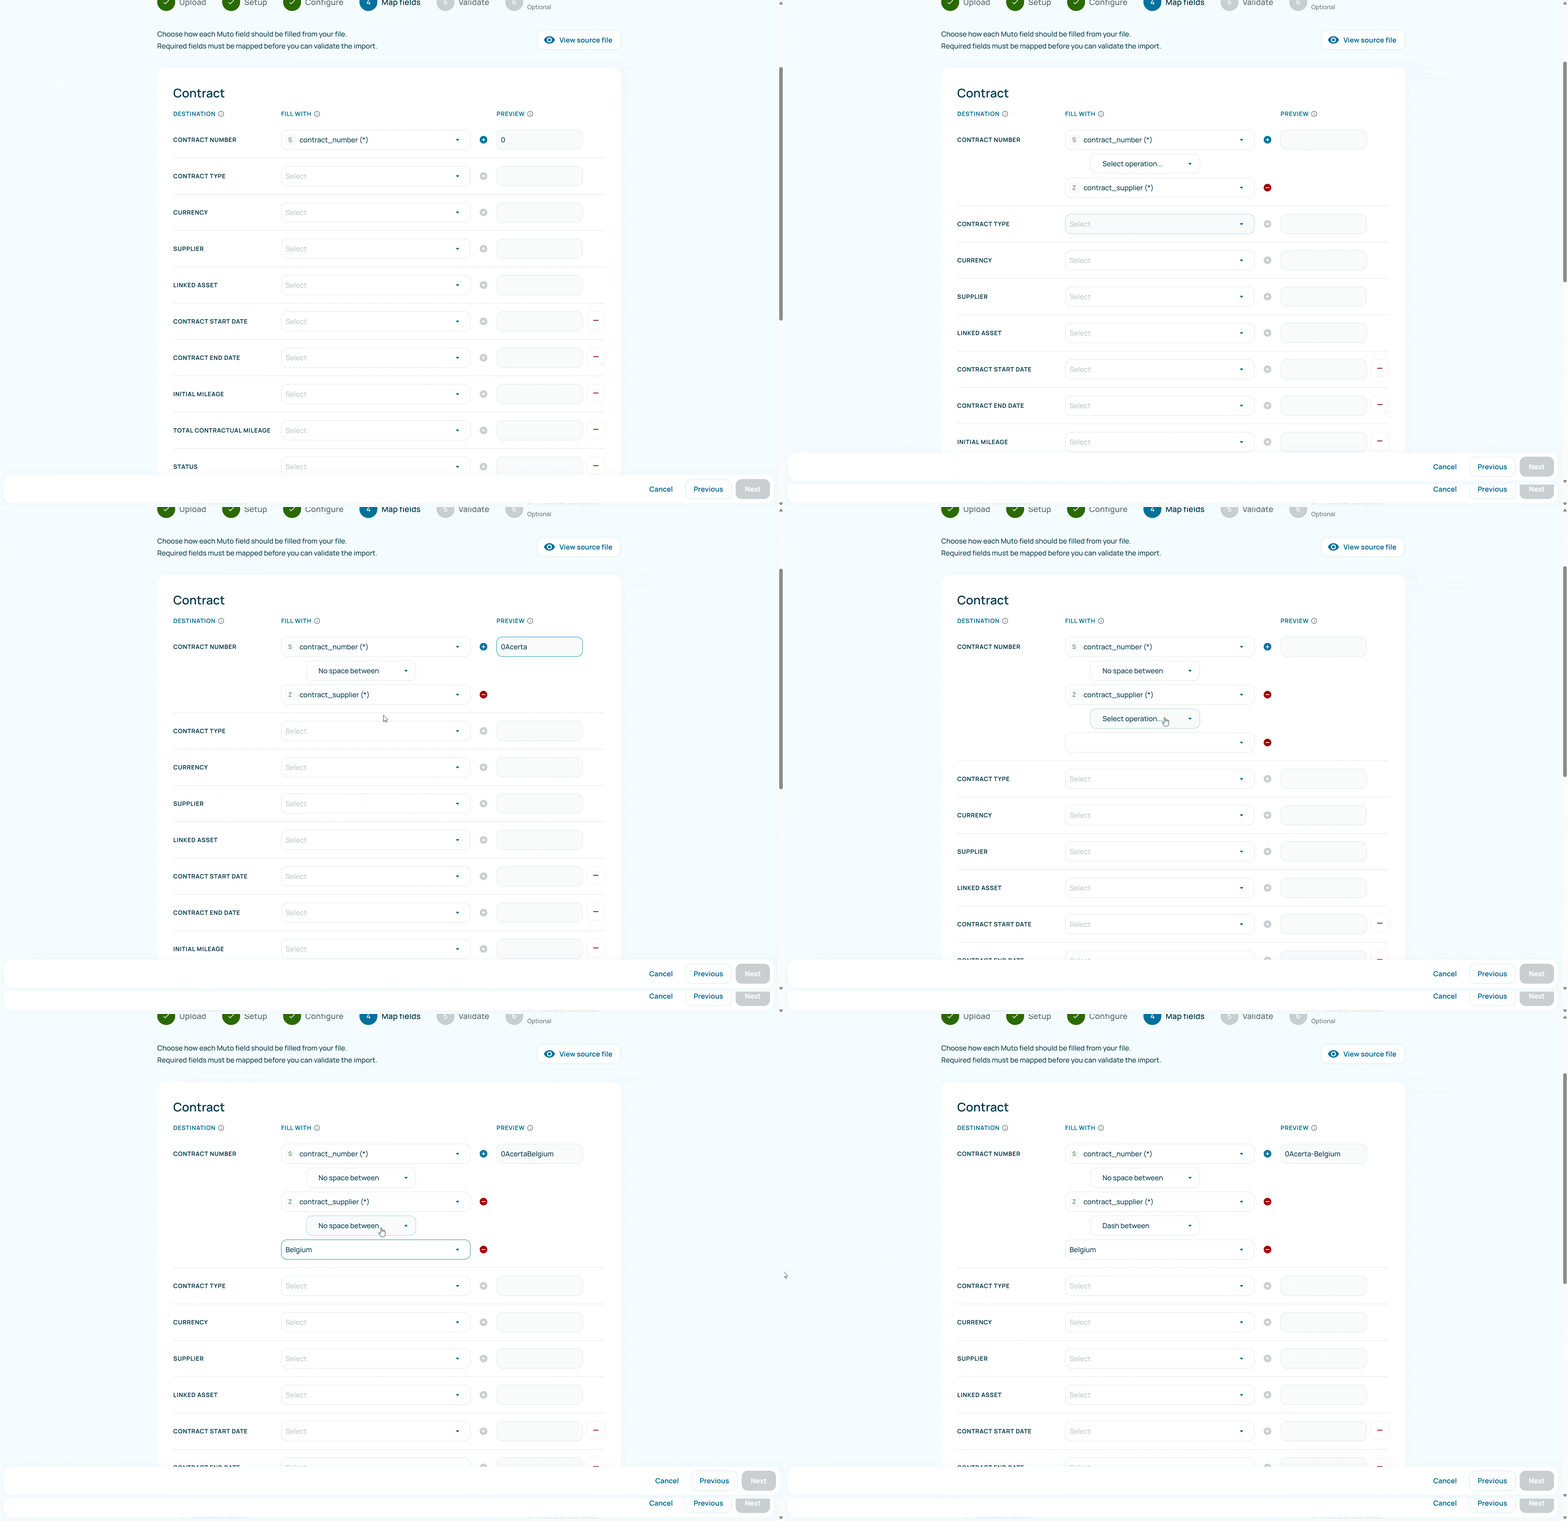
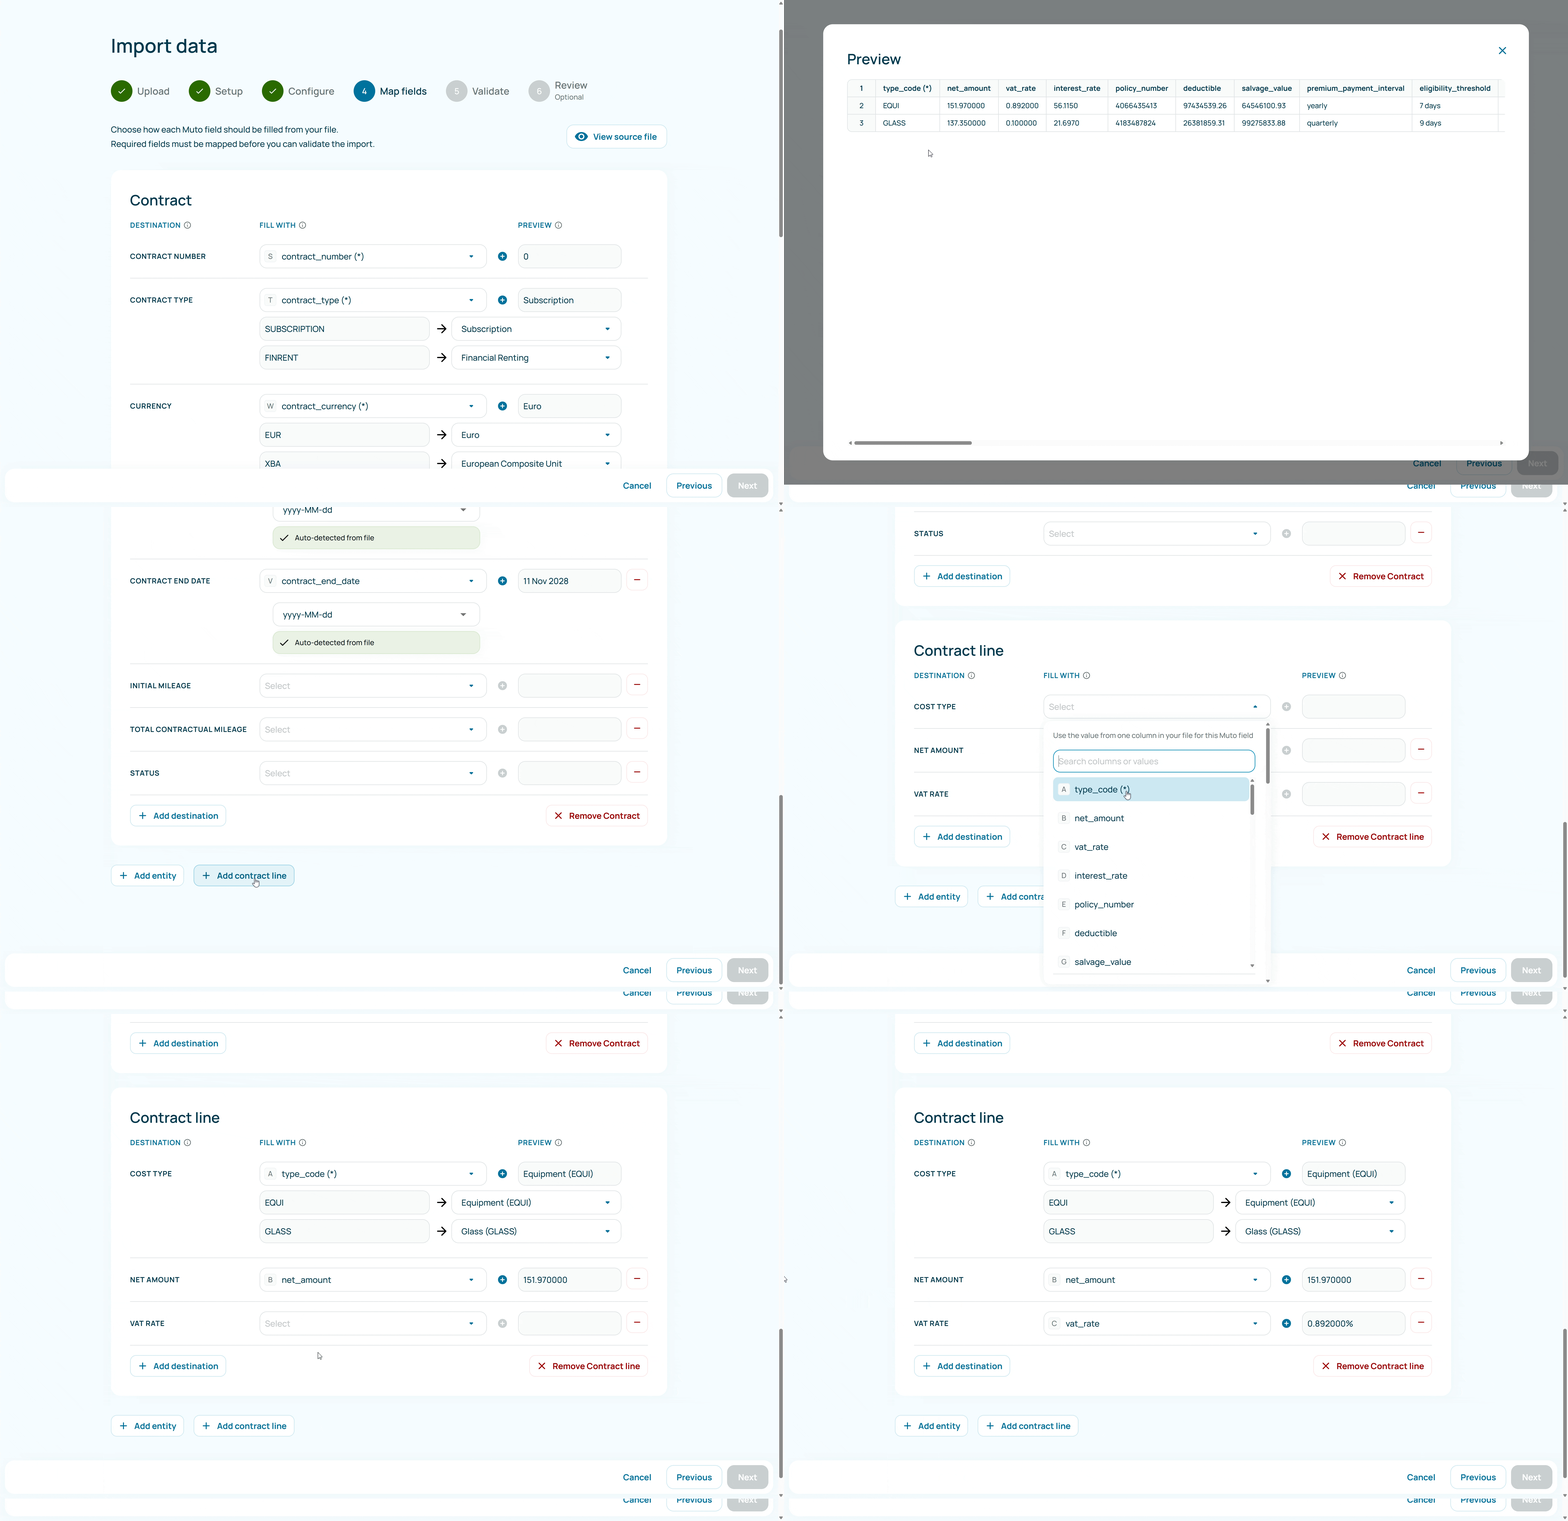
Create contracts with each line in a separate column
Use this option when one row in your file contains all contract lines in separate columns. For example, the same row may contain the monthly lease amount, insurance amount, and maintenance amount.
- Select Contracts as the entity to import.
- Map the contract-level fields, such as contract number, supplier, and dates.
- Add a contract line for each cost or service column.
- Map each line’s type, amount, VAT rate, and other required fields.
- Review the preview to confirm that multiple lines are created for each contract.
Example: Map “Lease amount” to one contract line and “Insurance amount” to another. Both lines will be connected to the same contract.
Create contracts with each line on a separate row
Use this option when each contract line already appears on its own row in your file. Several rows can belong to the same contract.
- Select Contracts as the entity to import.
- Map the fields that identify the contract.
- Add a contract line and map the line-level fields.
- Use the shared contract number or another identifier to connect the lines to the correct contract.
- Review the preview and validation results before importing.
Make sure every line has enough information to be linked to a contract. Missing identifiers may result in lines that cannot be connected correctly.
Create invoices with each line in a separate column
Use this option when one row contains several invoice lines in different columns. For example, an invoice may have separate columns for fuel, leasing, and maintenance.
- Select Invoices as the entity to import.
- Map the invoice-level fields, such as invoice number, supplier, and invoice date.
- Add an invoice line for each relevant source column.
- Map the line type, net amount, VAT rate, and other available details.
- Check the preview to confirm that each source column becomes a separate invoice line.
Create invoices with each line on a separate row
Use this option when every invoice line is stored on its own row. Multiple rows can belong to the same invoice.
- Select Invoices as the entity to import.
- Map the invoice-level fields.
- Add an invoice line and map the line-level fields.
- Use the invoice number to group the lines under the correct invoice.
- Review the result before starting the import.
Enter VAT rates correctly
Enter the VAT rate as a percentage, without the percentage sign. For example, enter 21 for 21% VAT, not 0.21.
- 21% VAT → enter 21
- 6% VAT → enter 6
- 0% VAT → enter 0
Check the preview after mapping the VAT rate. If your source file uses decimals, use a calculation to convert the value to a percentage before importing it.
Choose between ad hoc and non-ad hoc cost types
Use an ad hoc cost type for a one-off or exceptional cost that does not belong to a recurring contract or invoice category.
Use a non-ad hoc cost type when the cost is a standard, recurring, or predefined category in your mobility administration.
- Ad hoc: a one-time correction, exceptional service, or unusual charge.
- Non-ad hoc: lease, insurance, maintenance, fuel, or another regular cost category.
Choose the closest matching cost type available in Muto. Consistent cost types improve reporting and make imported data easier to analyse.
Use value mapping
Value mapping lets you convert values from your source file into the values Muto expects. This is useful when your supplier uses different names, abbreviations, or codes.
- Open the field you want to configure.
- Open the additional mapping or transformation options. This option may be hidden below the direct column mapping.
- Select Value mapping.
- For each source value, select or enter the corresponding Muto value.
- Review the preview to confirm the result.
Example: Map the supplier value BE to Belgium, or ACT to Active.
If you cannot find value mapping, expand the field’s mapping options or open the transformation menu. It is available as an additional option rather than as a separate field.
Remove fields you do not need
Every field shown in the mapping workspace must be completed before you can continue. If a field is not relevant for your import, remove it from the mapping instead of leaving it empty.
- Review all fields in the mapping workspace.
- Complete every field you want to import.
- Remove fields that are not needed.
- Run the validation and resolve any remaining errors.
A clean mapping contains only the fields you need and has no empty required mappings. This makes validation easier and helps prevent incomplete records.
Review your import
Before completing the import, Smart Import shows a preview of the data.
Review the following items carefully:
- Missing mandatory fields.
- Incorrectly mapped columns.
- Missing or incorrect supplier and asset matches.
- Invalid dates.
- Dates, currencies and percentages.
- Amounts, VAT rates and calculated values.
- Values created by merging multiple columns.
- Any warnings or validation errors.
You can use Find and replace to quickly correct repeated values before completing the import.
When everything looks correct, click Complete Import.
Import history
To review previous imports, go to:
Dashboard → Import Data → Import History
Here you can track your completed imports and consult the history of imported data.
Tips and best practices
- Use clear and recognisable column headers.
- Always review the preview before completing an import.
- Check calculated values carefully when importing financial data.
- Make sure identifiers such as invoice numbers, contract numbers, asset numbers and supplier names match the information already available in Muto.
- Smart Import remembers similar mappings, making recurring imports faster and easier.
- Always ensure required columns are mapped; optional columns may be left unmatched if not needed.
- For Employees:
- Name, Surname, Mobility Policy, Date in service, Personnel number
- Personal Car, LCV, Bicycle, Speed Pedelec, Other Vehicle:
- Identification Number (licenseplate number), Status
- Cards:
- Identification Number (Card number), Status
- Charging Station:
- Identification Number (Station number), Status
- Contracts:
- Type code (Cost type code), Contract Number, Contract type, Currency, Supplier, Asset
- Invoice:
- Net amount, VAT rate, Type code (Cost type code), Asset (Asset identification number), Invoice number, Currency, invoice date, Supplier name
- Energy stop:
- Date, fuel type, quantity
- Assignments:
- Employee number, Asset number (License plate, fuel card number, ...)
- For Employees: